At Spinifex Energy, we’ve seen firsthand how commercial solar system installation can transform businesses. The process might seem daunting, but with the right guidance, it’s a smooth journey towards energy independence and cost savings.
In this guide, we’ll walk you through the key steps of installing a commercial solar system, from initial assessment to final testing. Whether you’re a small business owner or a large corporation, this information will help you make informed decisions about your solar energy future.
How to Plan Your Commercial Solar Installation
Assessing Your Roof
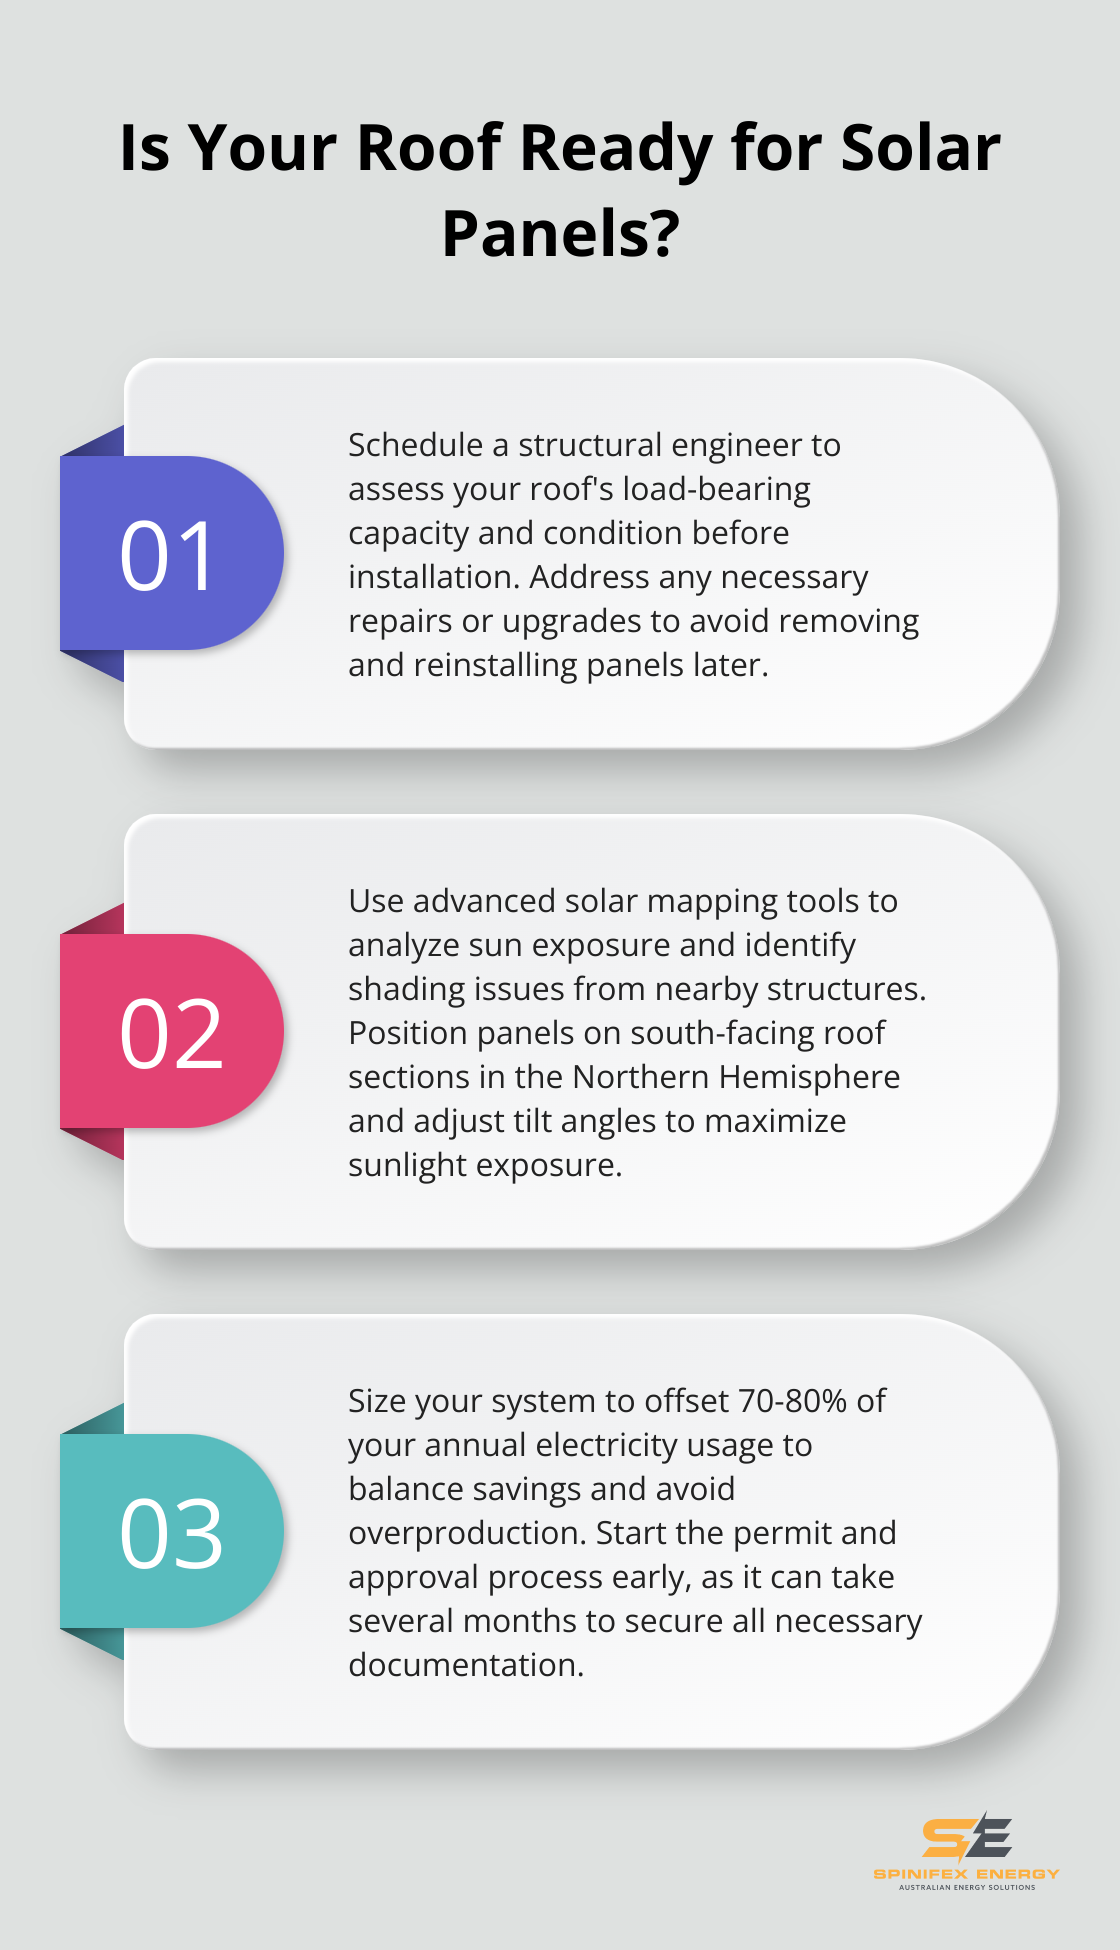
The first step in planning your commercial solar installation involves a thorough site assessment to determine the feasibility of a solar installation at the commercial location. We recommend you hire a structural engineer to evaluate your roof’s condition and load-bearing capacity. This professional assessment will determine if your roof can support the weight of solar panels, considering both the dead load (permanent static weight) and live load.
During this evaluation, check for any necessary repairs or upgrades. It’s more cost-effective to address these issues before installation rather than removing and reinstalling panels later.
Analyzing Sun Exposure
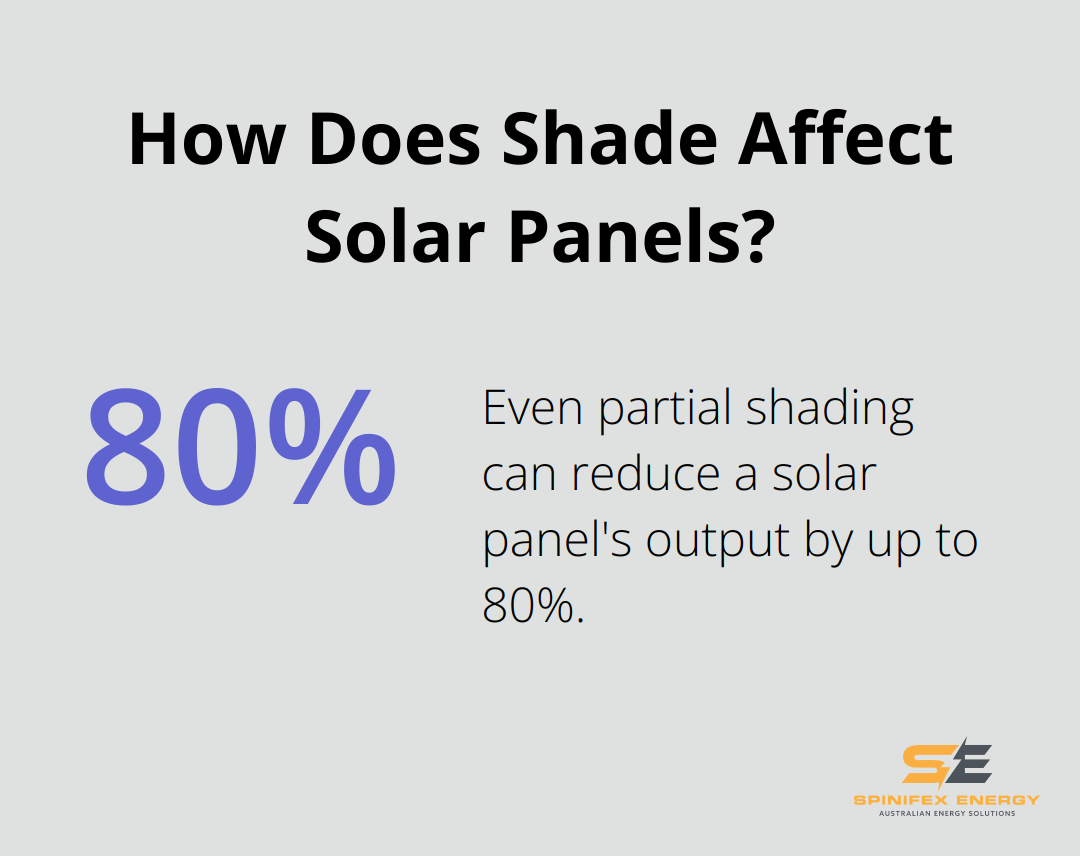
Next, conduct a detailed sun exposure analysis. Use advanced solar mapping tools to track the sun’s path across your property throughout the year. Identify any potential shading issues from nearby buildings, trees, or other structures that could impact your system’s performance.
The National Renewable Energy Laboratory reports that even partial shading can reduce a solar panel’s output by up to 80%. This fact underscores the importance of designing a system that maximizes sun exposure.
Optimizing Panel Placement
Based on your sun exposure analysis, determine the optimal placement for your solar panels. This often means positioning panels on south-facing roof sections in the Northern Hemisphere, as these receive the most direct sunlight throughout the day.
Consider the tilt angle of your panels as well. The ideal tilt angle typically equals your latitude, but you may need to adjust this based on your specific energy needs and local weather patterns.
Sizing Your System
Determining the right size for your commercial solar system is critical. Analyze your energy consumption patterns over the past 12-24 months to understand your electricity needs. This data helps design a system that meets your current demands and accounts for future growth.
A common mistake is oversizing a system. While it might seem beneficial to generate more power, many utility companies limit how much excess energy they’ll buy back. Try to size your system to offset 70-80% of your annual electricity usage, striking a balance between maximizing savings and avoiding overproduction.
Navigating Permits and Approvals
The final step in the planning phase requires securing necessary permits and approvals. This process varies depending on your location but typically includes building permits, electrical permits, and utility interconnection agreements.
Handle this paperwork early, liaising with local authorities and your utility company to ensure all requirements are met. This can take anywhere from a few weeks to several months, so it’s important to start this process early to avoid delays in your installation timeline.
With meticulous planning of each aspect of your commercial solar installation, you set the stage for a smooth, efficient, and successful project. This attention to detail often leads to significant energy savings and return on investment. As we move forward, let’s explore the next critical phase: choosing the right equipment for your commercial solar system.
What Equipment Do You Need for Commercial Solar?
Solar Panels: The Powerhouse of Your System
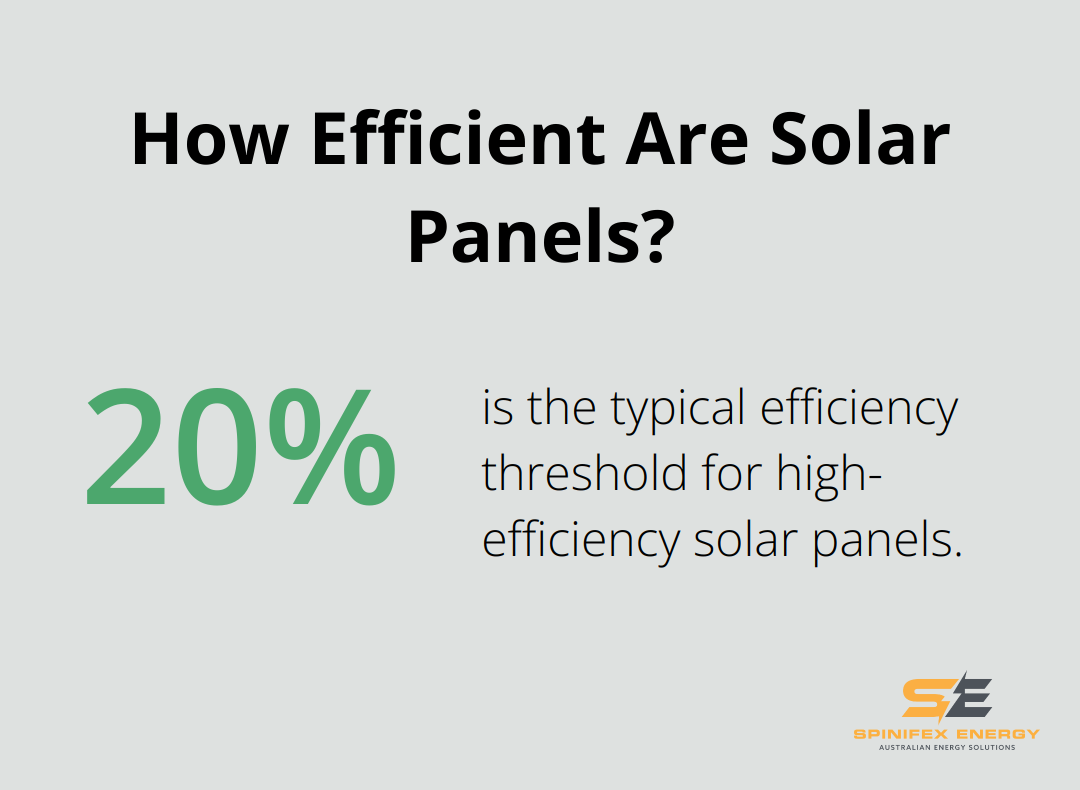
Solar panels form the core of your commercial solar system. High-efficiency panels (typically above 20%) will maximize energy production. Monocrystalline panels offer top efficiency but come at a premium price. Polycrystalline panels provide a more budget-friendly option with slightly lower efficiency.
When selecting panels, consider the warranty and degradation rate. Top manufacturers offer warranties of 25 years or more, with annual degradation rates below 0.5%. This means your panels will still produce at least 87.5% of their original output after 25 years.
Inverters: The Power Converters
Inverters transform the DC electricity from your panels into usable AC power. For commercial installations, string inverters or central inverters often prove cost-effective for larger systems.
If your roof has complex shading issues or multiple orientations, microinverters or power optimizers can be beneficial. These options allow for panel-level optimization, which minimizes the impact of shading on overall system performance.
Mounting Systems: The Structural Support
Your mounting system must withstand decades of weather exposure while keeping your panels secure and optimally positioned. Flat roofs often use ballasted systems (which don’t require roof penetrations). Pitched roofs typically employ rail-based systems attached directly to the roof structure.
Always select mounting systems certified to withstand your local wind and snow loads. In coastal areas, choose corrosion-resistant materials like anodized aluminum or stainless steel to ensure longevity.
Energy Storage: The Power Bank
While not essential, energy storage systems have gained popularity for commercial installations. These systems store excess energy produced during the day for use during peak evening hours or cloudy days.
Lithium-ion batteries currently set the standard due to their high energy density and long cycle life. When sizing a battery system, analyze your nighttime energy usage and any demand charges from your utility. A well-sized battery can significantly reduce these charges by shaving peak demand.
The equipment you choose will directly impact your system’s performance and ROI. Investing in quality components often pays off through increased energy production and reduced maintenance costs.
As you plan your commercial solar project, research and consult with experts about the best equipment for your specific needs. The right choices will set the foundation for a successful, long-lasting solar installation that delivers optimal returns for your business. Now, let’s move on to the next critical phase: the actual installation process of your commercial solar system.
How Does the Solar Installation Process Work?
Roof Preparation and Mounting Hardware Installation
The installation process begins with thorough roof preparation. Our team cleans the roof surface, repairs any damage, and applies sealants to prevent water infiltration. We then mark precise locations for mounting hardware, ensuring optimal panel placement based on the earlier site assessment.
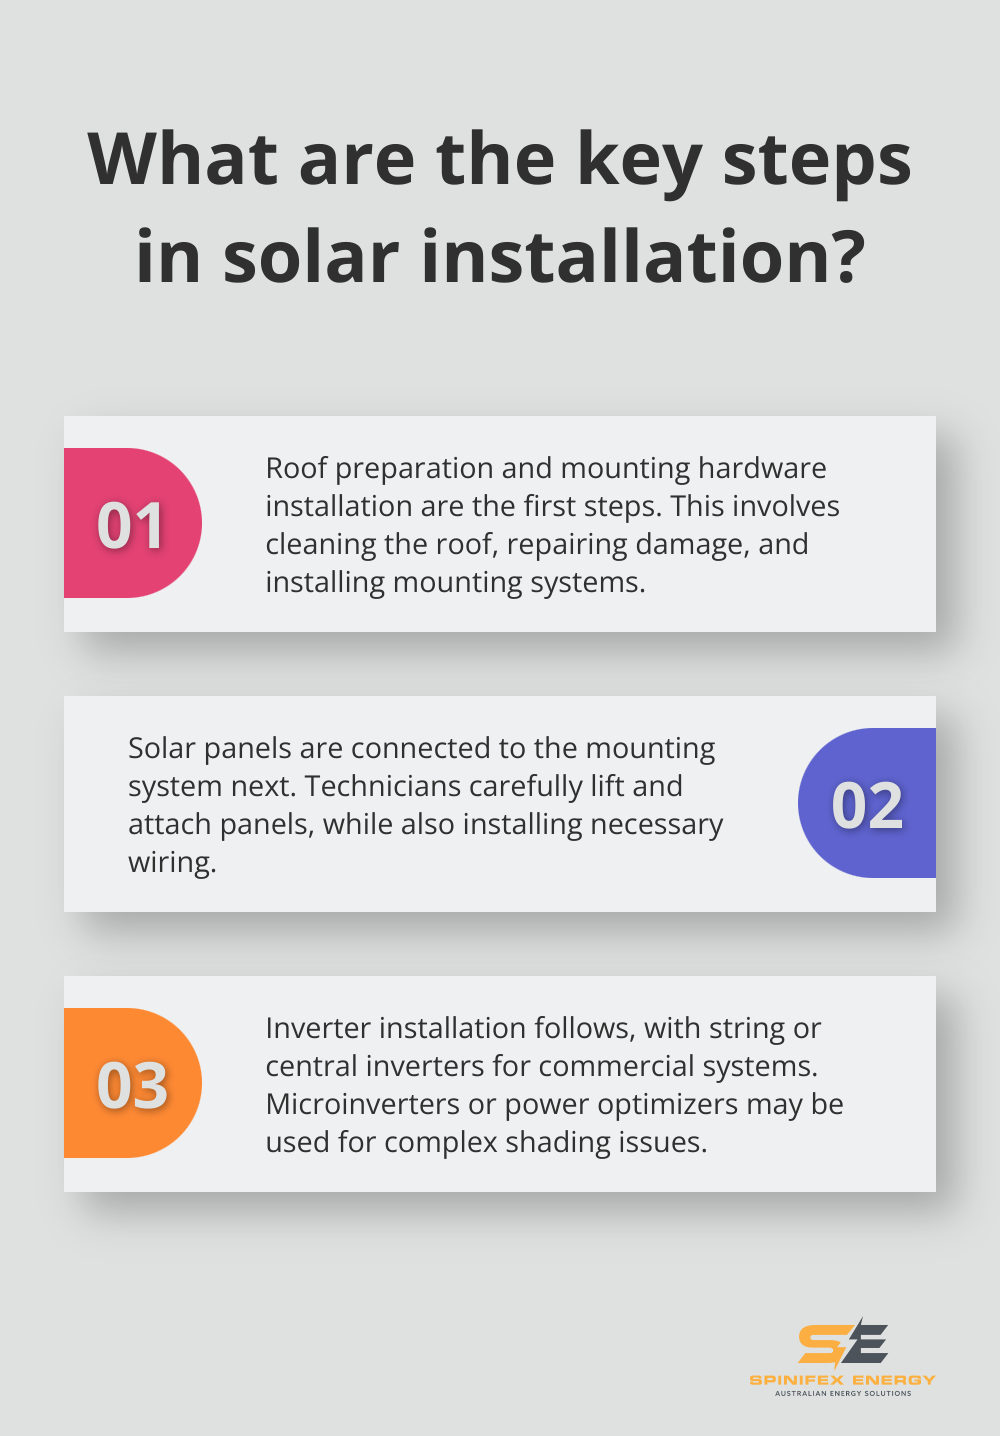
Next, we install the mounting hardware. Flat roofs often use ballasted systems that don’t require roof penetrations. For pitched roofs, we use specialized flashing and sealants to create watertight attachments. All mounting systems must withstand local wind and snow loads (with extra precautions for areas prone to extreme weather).
Solar Panel Connection to Mounting System
After securing the mounting hardware, we install the solar panels. Our technicians carefully lift each panel onto the roof and attach it to the mounting system. We use specialized tools to ensure perfect alignment and secure fastening of each panel.
During this phase, we also install the necessary wiring. We connect each panel in series to form strings, which then connect to the inverters. All wiring receives proper insulation and secure fastening to protect against environmental factors and wildlife interference.
Inverter Installation and Connection
Inverter installation is a critical step in the process. For most commercial systems, we install string inverters or central inverters in a protected area, often near the main electrical panel. We mount these inverters securely and connect them to both the solar array and the building’s electrical system.
If the system uses microinverters or power optimizers, we typically install these on the roof, directly behind or underneath each solar panel. This setup allows for panel-level monitoring and optimization (particularly beneficial for systems with complex shading issues).
Monitoring System Setup
A robust monitoring system tracks your solar system’s performance. We install sensors and data loggers that connect to a central monitoring platform. This system allows you to track real-time energy production, identify performance issues, and quantify energy savings.
Many modern monitoring systems also integrate with smart building management systems, enabling more comprehensive energy management across your entire facility.
System Testing and Quality Checks
The final step involves rigorous testing and quality checks. Our technicians conduct a series of tests to ensure all components function correctly and safely. This includes checking all electrical connections, verifying proper grounding, and testing inverter performance.
We also perform a commissioning test, running the system at full capacity to ensure it produces the expected amount of power. We address and resolve any discrepancies immediately.
Throughout the entire installation process, our team adheres to strict safety protocols and industry best practices. We coordinate closely with your facilities management team to minimize disruption to your business operations.
Final Thoughts
Commercial solar system installation transforms businesses, offering energy independence and cost savings. The process requires careful planning and expert guidance to navigate site assessment, equipment selection, and installation. Professional technicians optimize system efficiency and longevity while adhering to safety standards and local regulations.
Ongoing maintenance ensures peak performance of your solar system. Regular inspections and performance checks identify issues early, extending system life and maintaining efficiency. Commercial solar system installation reduces carbon footprints, enhances brand image, and provides a hedge against rising electricity costs.
Spinifex Energy specializes in guiding businesses through their solar journey. Our energy consulting services help optimize electricity expenses, potentially saving up to 100% on energy costs. We combine advanced solar power systems with innovative battery storage solutions to maximize savings and promote sustainability.